WooCommerce fraud prevention is simplest when you stop bad orders before they settle, not after a chargeback hits your account. The first thing you get about any buyer is their IP address, and it shows up before they type a single digit of their card number. FraudShield is a WooCommerce fraud detection plugin that runs every order through the ipgeolocation.io IP Geolocation API, scores the IP against 9 fraud signals, and tells WooCommerce what to do.
This tutorial walks through setup from install to first protected order. Roughly 20 minutes if you already have a paid ipgeolocation.io account. If not, the first five go toward creating one.
TL;DR
- What FraudShield does: Scores every WooCommerce order's IP against 9 fraud signals and fires an action (log, alert, hold, cancel, or flag) based on the score.
- What you need: WooCommerce 7.0+ on WordPress 6.0+, an ipgeolocation.io account on a paid plan, admin access to your site.
- Setup time: Around 20 minutes.
- The 9 signals: Country mismatch, VPN, Tor exit node, proxy, residential proxy, known attacker IP, bot traffic, spam source, cloud / datacenter IP.
- Per-tier outcomes: Log-only (Low), email alert (Medium), hold / cancel / flag (High).
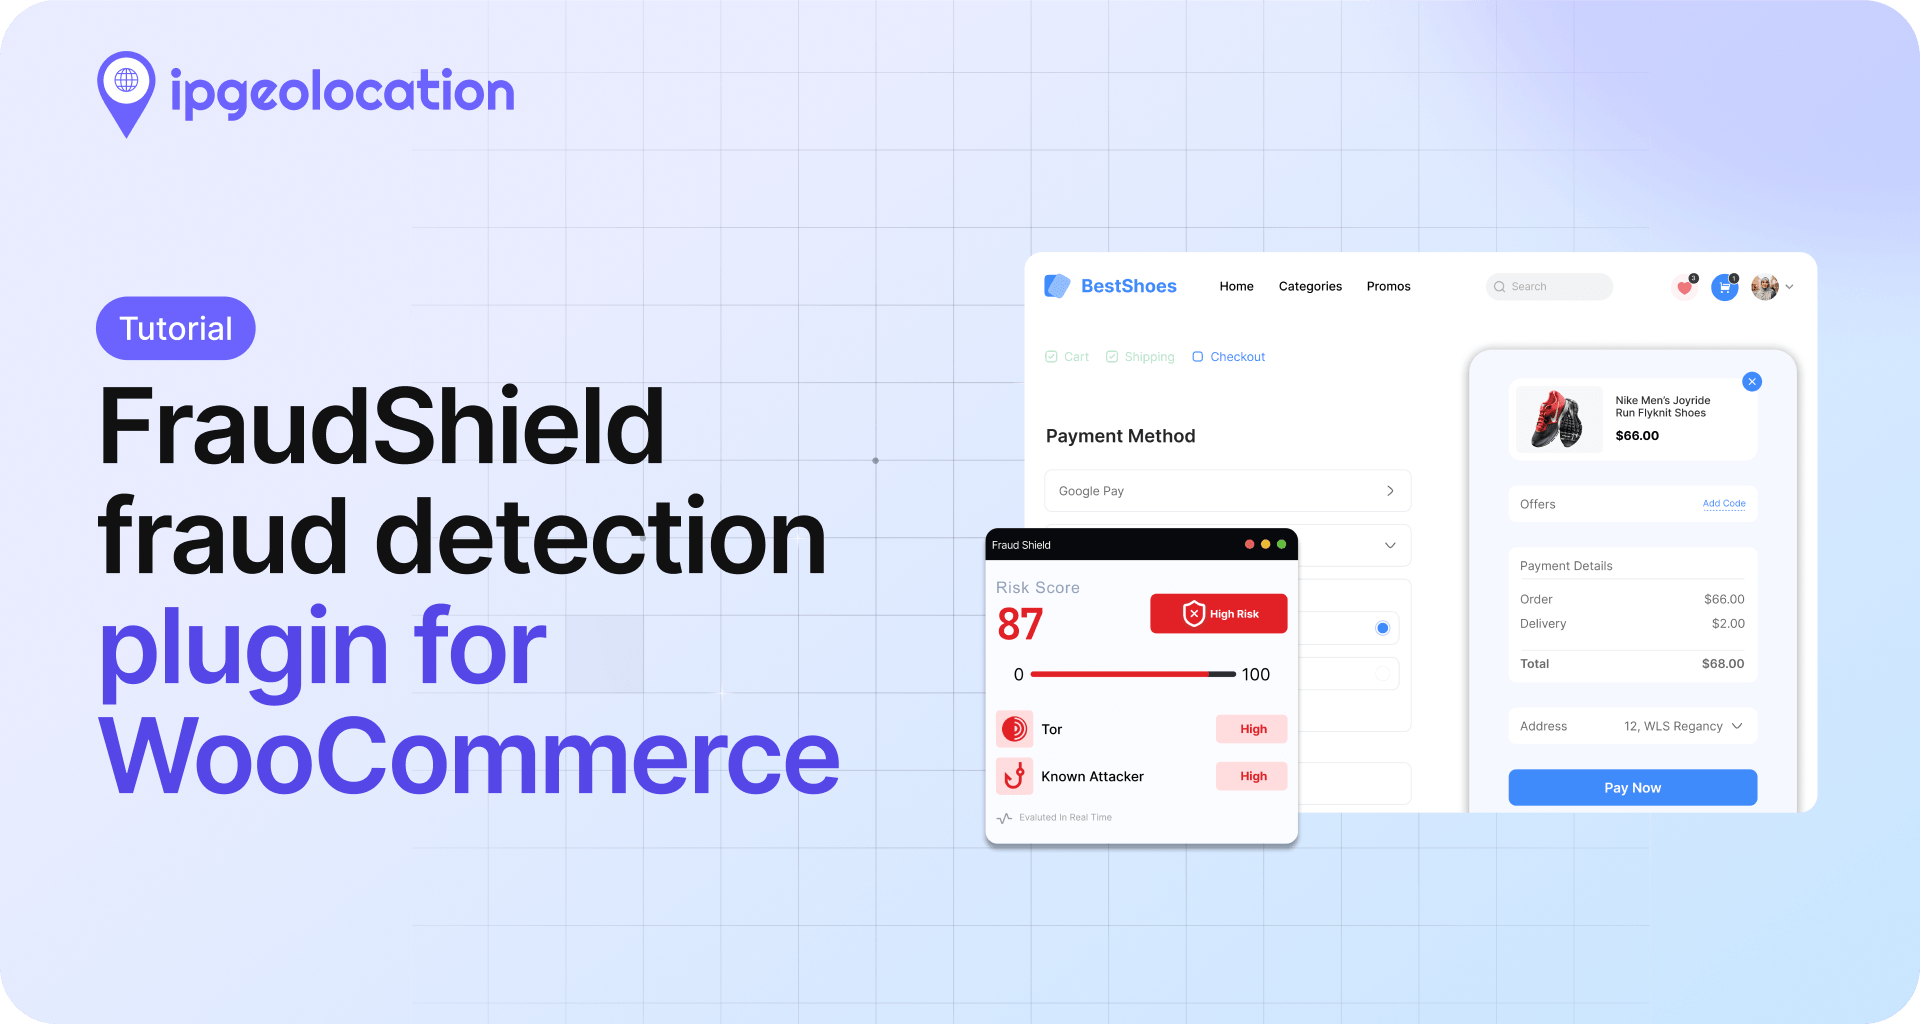
FraudShield sits between WooCommerce and your payment processor. When a buyer reaches checkout, the plugin sends their IP to ipgeolocation.io, gets back a 0 to 100 risk score, and applies the action you configured. The whole check takes a few hundred milliseconds and does not slow checkout in any way a customer will notice.
How FraudShield handles WooCommerce fraud prevention
The IP is the first thing your store learns about a buyer at checkout. It arrives before the address, the card, the phone number. That matters because the fastest way to stop fraud is to catch it before a payment attempt, not after.
FraudShield sends the buyer's IP to the ipgeolocation.io IP Geolocation API, which returns both geolocation and security signals used in scoring. The plugin reads 9 signals and combines them into a 0 to 100 risk score. It supports two scoring modes:
- Weighted: Each signal has a default weight. The plugin adds them together and caps the result at 100.
- Critical override: If any signal you marked "critical" fires, the score jumps straight to 100 and the high-risk action runs.
This is the core of IP fraud detection for WooCommerce: a transparent score you can inspect, with weights you can tune. Most fraud tools hand you a closed ML score with no way to see why an order was flagged. FraudShield exposes every signal, every weight, and every decision. You can adjust what fits your store.

Before you start
You will need:
- WooCommerce 7.0 or newer on WordPress 6.0 or newer.
- An ipgeolocation.io account on a paid plan. A paid API key is required, as the plugin depends on security signals (VPN, Tor, proxy connection, residential proxy, known attacker, bot, spam, cloud/datacenter IP) not included in the free tier. Country mismatch is computed locally from the billing address and the IP's country, so it works on any tier but is not enough on its own.
- Admin access to your WordPress site.
- About 20 minutes of uninterrupted time.
You do not need to touch code. Everything happens inside the WooCommerce admin.
Step 1: Install FraudShield
Open your WordPress dashboard. Go to Plugins > Add Plugin. Search for "IPGeolocation FraudShield" Click Install, then Activate.
Once active, you will see FraudShield in the WordPress admin menu and a Settings submenu underneath. Head there next.
Step 2: Connect your ipgeolocation.io API key
FraudShield does not ship its own fraud database. It relies on the ipgeolocation.io IP Geolocation API for every check. A paid API key is required, as the plugin depends on security signals not included in the free tier.
- Sign up at ipgeolocation.io and subscribe to a paid plan. Security signals are only available on paid tiers.
- From your account dashboard, copy your API key.
- Back in WordPress, go to FraudShield > Settings > API.
- Paste the key into the API Key field.
- Click Test Connection.
If the test succeeds, you will see a green result reading API key is valid. If it fails, the exact error returned by the API is displayed below the button (invalid key, expired subscription, or a plan-level restriction), so you know what to fix without guessing.
Different paid tiers come with different signal sets, so the active signals depend on which plan you are on. The pricing page lists exactly which signals come with each tier.
A free API key will not work for FraudShield. Country mismatch alone will not protect you from a card-testing attack routed through a US residential proxy, and the full set of signals requires a paid plan.
Click Save Changes before leaving this screen. An unsaved API key will not be used by the plugin, and every order will fall back to the API-down behavior set in Step 6.
Step 3: Configure the 9 fraud signals
This is the section where the plugin's behavior gets decided. Each signal has three controls:
- Enable / disable: Turn the signal on or off.
- Weight: How much this signal contributes to the 0 to 100 risk score.
- Critical: If marked, this signal alone pushes the score to 100 and fires the high-risk action.
Here is the full signal reference with defaults and tuning notes from real store testing.
| Signal | What it catches | Default weight | Good critical candidate? |
|---|---|---|---|
| Country mismatch | Buyer's IP country differs from billing country | 25 | No. False positives on travelers and expats. |
| VPN detected | IP matches a commercial VPN exit | 30 | Optional. Depends on your product. |
| Tor exit node | Request routed through Tor | 40 | Yes for most stores. |
| Proxy detected | Known proxy server | 30 | Optional. |
| Residential proxy | Proxy masking as a home internet connection | 20 | No. Hard to distinguish from real residential traffic. |
| Known attacker IP | IP flagged in threat intelligence feeds | 45 | Yes. |
| Bot traffic | Automated or non-human request | 35 | Optional. |
| Spam source | IP tied to a spam campaign history | 20 | No. Historical signal, not fresh fraud. |
| Cloud / datacenter IP | AWS, GCP, Azure, or similar hosting | 15 | No. Too many false positives on mobile tethering and corporate proxies. |
A few notes on tuning:
- The VPN and proxy detection signals are your biggest win against card testing. Keep them on at default weights.
- Residential proxy detection is the hardest to tune. Residential proxies share IP space with legitimate home broadband. Start at the default weight of 20 and raise it only if you see chargebacks you can trace back to this signal.
- Do not mark Cloud / datacenter IP as critical. Mobile carriers and corporate networks occasionally route through cloud infrastructure, and blocking all of them will take real customers off your site.
- Mark Tor exit node as critical unless you actively sell to privacy-focused buyers. Legitimate shoppers rarely use Tor.
If your store has a known risk pattern, adjust the weights accordingly. Digital goods (software licenses, gift cards, downloadable content) usually want Tor and residential proxy weights higher because chargebacks arrive fast and reversals are hard.
Click Save Changes at the bottom of the signals panel. Weights, toggles, and critical flags only take effect once saved. Leaving the screen with unsaved changes reverts everything to the previous configuration.
Step 4: Set risk tiers and default actions
Once the risk score is calculated, FraudShield decides which tier the order falls into and fires the configured action.
Default tiers:
- Low: 0 to 40. Safe by default. Action: log only.
- Medium: 41 to 70. Borderline. Action: email alert to store admin.
- High: 71 to 100. Treat as hostile. Action: hold, cancel, or flag for manual review.
Each tier has a dropdown with five action options: log, email, hold, cancel, or flag. Most stores start with log on Low, email on Medium, and hold on High. Hold lets you review before fulfilment. Cancel moves the order to a cancelled state immediately. Flag adds a label without changing the order status, which is useful if your staff triage flagged orders separately.
Critical override: If you marked any signal "critical" in Step 3, it bypasses the tier math entirely. One critical signal equals a score of 100 and runs the high-risk action. This is how you set hard blocks on Tor and known-attacker IPs without arguing with the math.
Configure SMTP before relying on email alerts. WordPress's built-in mail function is unreliable on most hosts and often lands in spam or fails silently. Install an SMTP plugin (WP Mail SMTP, Fluent SMTP, or similar) and connect it to a transactional sender (Postmark, SendGrid, Amazon SES, or your existing email service) before turning on Medium-tier email alerts. Without SMTP, "email" actions look configured in FraudShield but fail to deliver, and you will not know your fraud notifications are being lost.
Click Save Changes to commit the new tier thresholds and actions. Unsaved tier settings revert when you navigate away, and the plugin keeps running on the previous values.
When to tighten the thresholds. Digital goods fulfil fast and chargebacks land fast, so move Medium down to 35 and High down to 65. Physical goods have buffer because the order can still be intercepted at the shipping step. This is one of the clearest ways to block fraudulent orders in WooCommerce without annoying real buyers: set stricter tiers for faster delivery categories and looser tiers for slower ones.
Step 5: Test without placing real orders
Never turn this on in production without testing first. A misconfigured critical signal can freeze legitimate orders inside an hour.
FraudShield ships with a test mode that simulates fraud without running payments. Here is the flow:
- Go to FraudShield > Settings > Test Mode.
- Toggle test mode on.
- Pick a preset IP from the dropdown:
- Tor exit node: A current IP from the public Tor exit node list.
- Known VPN: A public commercial VPN exit.
- Residential proxy: An IP flagged as a residential proxy.
- Datacenter IP: An IP that resolves to a known cloud or hosting provider.
- Place a $0 or sandbox order (use a test payment gateway or manual order creation in the WooCommerce admin).
- Open the order in the WooCommerce admin.
In the FraudShield metabox on the order edit screen, check the following:
- The risk score matches what the preset IP should produce.
- The flagged signals match what you expect for that preset.
- The tier action fired (email sent, order held, etc.).
Repeat with every preset until the plugin behaves the way you expect.
Critical: turn test mode off and save before going live.
- Toggle test mode to off.
- Click Save Changes.
- Place one real test order and confirm the FraudShield metabox shows the buyer's actual IP, not the preset.
If you skip the save, the toggle reverts and the plugin keeps scoring every real order against the preset IP instead of the actual customer IP. Real customer IPs will be ignored, fraudulent orders will pass through, and your dashboard will look healthy because every order quietly resolves to whatever score the preset produces. This is the most common rollout failure with FraudShield. Verify the off-and-saved state on a live order before considering setup complete.
Step 6: Monitor orders and tune over time
Fraud patterns shift. What worked in month 1 will underperform in month 6 as attackers adapt. FraudShield gives you four surfaces to track and tune:
- Dashboard: 30-day rolling view. Stacked bar by day, donut by tier, recent 10 flagged orders. Quick read on whether fraud volume is climbing.
- Fraud Logs: Full history with filters by tier, date range, signal, and search by IP or order number. Use this to investigate a single chargeback or look for patterns across flagged orders.
- Orders list column: A color-coded risk score column added to the main WooCommerce Orders screen. Red for High, amber for Medium, green for Low.
- Order metabox: On every order edit screen, a sidebar widget shows the score, the flagged signals, the tier, and a re-check button. The re-check is useful if a customer's IP has changed between the order and the review.
Tuning loop: if false positives spike on one signal, lower its weight or disable it. If chargebacks still slip through, raise the High-tier threshold for stricter filtering, or promote a signal (usually VPN or residential proxy) to critical. Review the logs at least monthly if your store takes more than 100 orders a day. Weekly if you are in a high-fraud category like digital goods or subscriptions.
FAQ
The IP check runs in a few hundred milliseconds as part of the normal checkout lifecycle. In typical hosting, you will not see a measurable difference. Slow checkouts are almost always caused by the payment gateway or WooCommerce itself, not the fraud plugin.
Yes. On a free key, FraudShield only reads basic geolocation (country, city). The security signals that actually catch fraud (VPN, Tor, proxy, residential proxy, known attacker, bot, spam, datacenter) require a paid plan. Without them, country mismatch is the only signal that works, and that is not enough on its own. See the pricing page for which signals come with each tier.
Country mismatch. A traveler on a work trip, an expat ordering from their home country, or a customer on a corporate VPN based overseas will all trigger it. Keep the weight at the default (25) and never mark country mismatch as critical. This is where most first-time tuning mistakes happen.
FraudShield treats the order as Low risk by default (score 0) and logs a warning. You can change the fallback behavior in Settings: either block all orders when the API is down (strict) or allow them through with a flag for later review (permissive). Strict is the safer default for high-value stores.
Yes. Card testers route through cheap infrastructure: VPN, proxies, and Tor. Marking Tor and known-attacker IPs as critical and keeping VPN detection on at default weight handles the common vectors. For sophisticated attacks routed through residential proxies, raise the residential proxy weight or promote it to critical.
WooCommerce fraud plugins typically fall into two categories: closed-box ML scores you cannot tune, and velocity rules that look at payment patterns rather than the buyer's IP. FraudShield is a third option: transparent IP-layer scoring with weights and critical flags you control directly. See our guide on evaluating VPN and proxy detection APIs for a fuller look at IP-layer options.
What to do next
Start with FraudShield in log-only mode for 7 days. Let it score every order without taking action. You will see which signals fire most and whether the tiers match your actual fraud pattern.
At the end of the week, open the Fraud Logs. Note any false positives (legitimate orders flagged) and adjust the weights down. Once tuned, High-tier hits should be rare. If more than a few percent of orders land in High, the thresholds are too tight or a signal is over-weighted.
That is how to stop fraud orders on your WooCommerce store without blocking real customers. Full API reference, hook documentation, and webhook guidance lives in the ipgeolocation.io documentation hub.